Dear All, Today we will learn how to install DSpace 6.3 in Ubuntu 20.04 LTS. In previous post, we have install Ubuntu 20.04 LTS in Virtual Box so the next steps is to install DSpace into that Ubuntu OS. So just following are the installation guide to for installing DSpace, however you can always visit the official guide from the DSpace official website.
So, first of all update the Ubuntu OS and install basic software before actually start the installation, for that you need to open terminal and then start the following commands
Basic software before actually start the installation process
sudo apt update
sudo apt upgrade
sudo apt install vim
sudo apt-get install git
Vim is a highly configurable text editor built to make creating and changing any kind of text very efficient. It is included as “vi” with most UNIX systems and with Apple OS X.
Git is a free and open source distributed version control system designed to handle everything from small to very large projects with speed and efficiency.
Installation of prerequisite applications:
sudo apt install openjdk-8-jdk ant maven
Apache Ant is a Java library and command-line tool whose mission is to drive processes described in build files as targets and extension points dependent upon each other. The main known usage of Ant is the build of Java applications. Ant supplies a number of built-in tasks allowing to compile, assemble, test and run Java applications.
Apache Maven is a software project management and comprehension tool. Based on the concept of a project object model (POM), Maven can manage a project’s build, reporting and documentation from a central piece of information. Maven is a build automation tool used primarily for Java projects.
OpenJDK is a free and open-source implementation of the Java Platform, Standard Edition.
Apache Tomcat
go to /opt/
cd /opt/
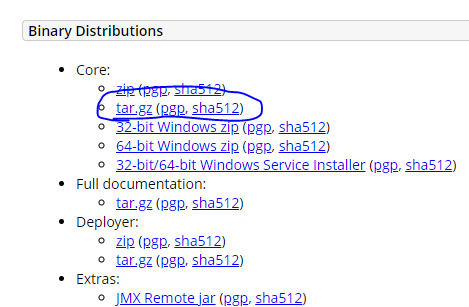
Then go to Apache download page, https://tomcat.apache.org/download-80.cgi then copy the tar.gz file in our current installation we are using https://apachemirror.wuchna.com/tomcat/tomcat-8/v8.5.68/bin/apache-tomcat-8.5.68.tar.gz
So download Apache tomcat on /opt/ using the following command
sudo wget https://apachemirror.wuchna.com/tomcat/tomcat-9/v9.0.48/bin/apache-tomcat-9.0.48.tar.gz
sudo tar -xvf apache-tomcat-9.0.48.tar.gz
Setup environment variables
Environment variables to find JAVA from the any location in the OS
So create one dspace.sh file on the /etc/profile.d/ location
sudo vim /etc/profile.d/dspace.sh
Then paste the following code on that file
#!/bin/bash
JAVA_HOME=/usr/lib/jvm/java-8-openjdk-amd64
CATALINA_HOME=/opt/apache-tomcat-9.0.48
PATH=$JAVA_HOME/bin:$PATH
export PATH JAVA_HOME
export CLASSPATH=.
Then save the file using :wq!
cd /etc/profile.d
sudo chmod 777 dspace.sh
source dspace.sh
After that Just reboot the PC and then start the Tomcat server using the following command
/opt/apache-tomcat-8.5.61/bin/startup.sh
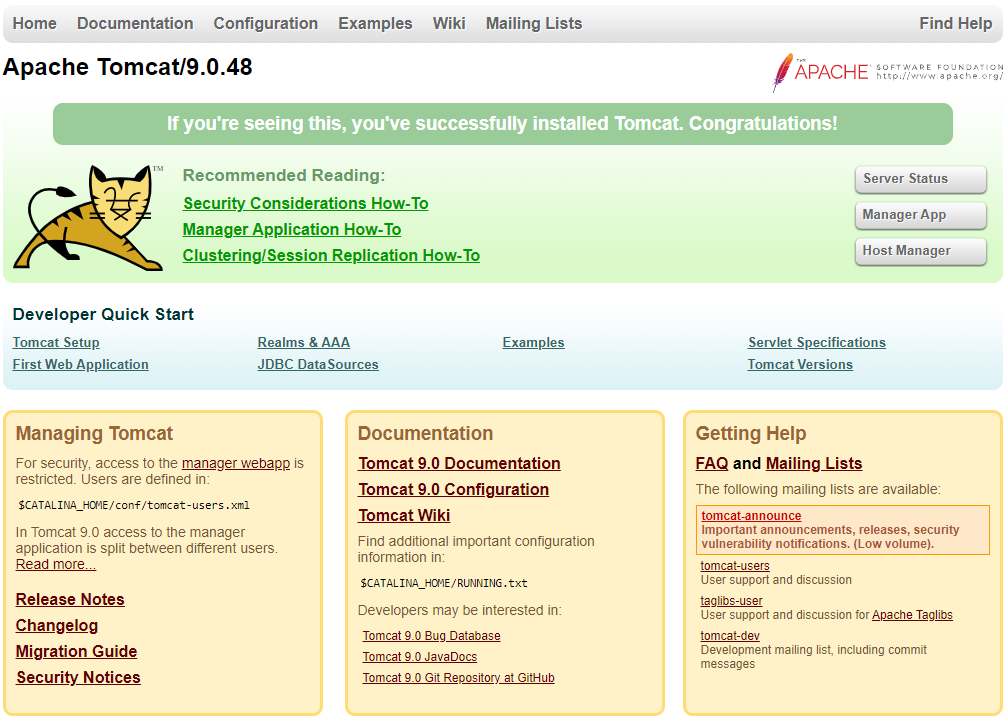
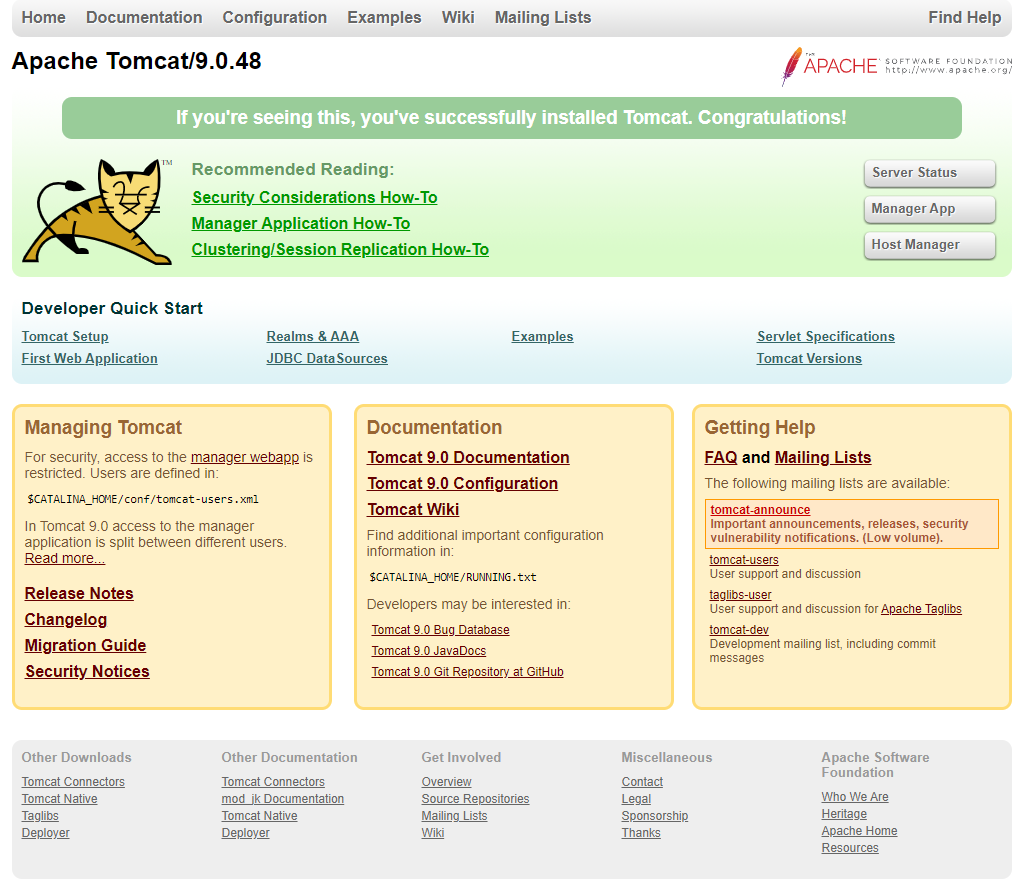
Open the browser and type http://localhost:8080/ It will display the Tomcat default Page
Install PostgreSQL:
PostgreSQL is a powerful, open source object-relational database system with over 30 years of active development that has earned it a strong reputation for reliability, feature robustness, and performance.
Apply the following commands one by one to install PostgreSQL 9.6.
sudo sh -c ‘echo “deb http://apt.postgresql.org/pub/repos/apt/ xenial-pgdg main” >> /etc/apt/sources.list.d/pgdg.list’
sudo wget –quiet -O – https://www.postgresql.org/media/keys/ACCC4CF8.asc | sudo apt-key add –
sudo apt-get update
INSTALL Dependency for PostgreSQL:
sudo vim /etc/apt/sources.list [ Add into last line – for security]
deb http://security.ubuntu.com/ubuntu bionic-security main
sudo apt update && apt-cache policy libssl1.0-dev
sudo apt-get install libssl1.0-devsudo apt-get install libpq5
sudo apt-get install postgresql-client-9.6
sudo apt install postgresql-9.6
Login to PostgreSQL and create the database
sudo su postgres
Create User:
createuser –username=postgres –no-superuser –pwprompt dspace
Enter a password for new role: [Enter a password e.g. dspace]
Create Database:
createdb –username=postgres –owner=dspace –encoding=UNICODE dspace
Crypto:
psql –username=postgres dspace -c “CREATE EXTENSION pgcrypto;”
exit
Open the following file,
sudo vim /etc/postgresql/9.6/main/pg_hba.conf
Add this line to the configuration file at the end:
IPV4:
host dspace dspace 127.0.0.1/32 md5
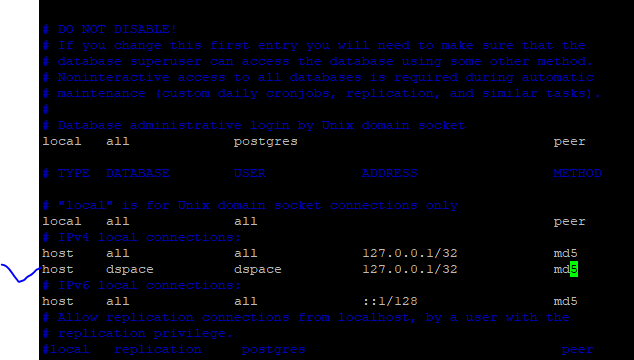
save and close the file using :wq!
Restart PostgreSQL :
sudo /etc/init.d/postgresql restart
DSpace Installation
Create DSpace User and Folders
cd /
mkdir dspace
mkdir dspace_build
Create DSpace User as a Sudo User:
sudo adduser dspace
sudo useradd -m -s /bin/bash -c “DSpace User” dspace
sudo passwd dspace
sudo usermod -aG sudo dspace
su – dspace
Now change the permission and owner of that dspace and dspace_build folder
chmod 777 dspace_build/ -R
chmod 777 dspace/ -R
chown dspace dspace/ -R
Now download the source code of DSpace 6.3 into dspace_build folder

cd /dspace_build
wget https://github.com/DSpace/DSpace/releases/download/dspace-6.3/dspace-6.3-src-release.tar.gz
tar -xvf dspace-6.3-src-release.tar.gz
Now we need to remove some code from pom.xml file
sudo vim /dspace_build/dspace-6.3-src-release/dspace-api/pom.xml
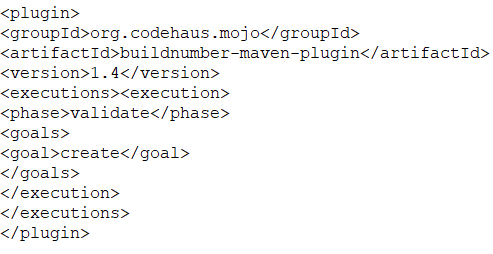
Remove the following group of codes. Carefully check the lines in the file. and then save and close that file (:wq!)
Installation of DSpace
Enter into DSpace package folder and apply following commands one by one.
cd /dspace_build/dspace-6.3-src-release
Now install DSpace using dspace user Only
su dspace
mvn package
It will take time based on your internet speed, once you received the BUILD SUCCESS message then execute the following commands
cd dspace/target/dspace-installer
sudo ant fresh_install
Create Admin account in Dspace
/dspace/bin/dspace create-administrator
Email: {Enter your valid email address}
First Name: {Enter First Name{
Last Name: {Enter Last Name}
Password: {Enter Password}
Then press Y for all information is correct
Now inform to apache server what is the path of jspui & xmlui for DSpace
for that create the files and set the path, Go to localhost folder in apache tomcat
/opt/apache-tomcat-9.0.46/conf/Catalina/localhost
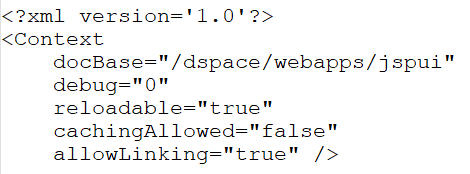
Set path for JSPUI:
vim jspui.xml
write the below code in jspui.xml file and then save and close this file
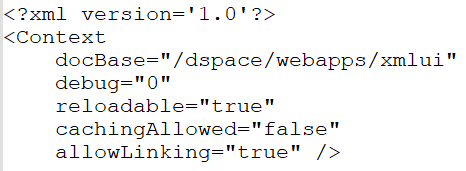
Set path for XMLUI:
vim xmlui.xml
write the below code in xmlui.xml file and then save and close this file
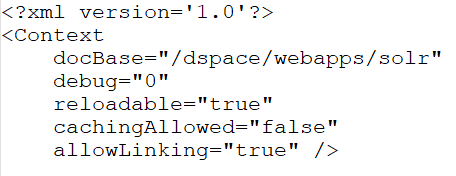
Set path for Solr:
vim solr.xml
write the below code in solr.xml file and then save and close this file
Now all is set, now you have to start the tomcat using the following command
Start the Tomcat Server
/opt/apache-tomcat-9.0.48/bin/startup.sh
After successfully start the Tomcat server enter the following URLs in your browser
Tomcat Webpage: http://localhost:8080
XMLUI Interface of DSpace: http://localhost:8080/xmlui
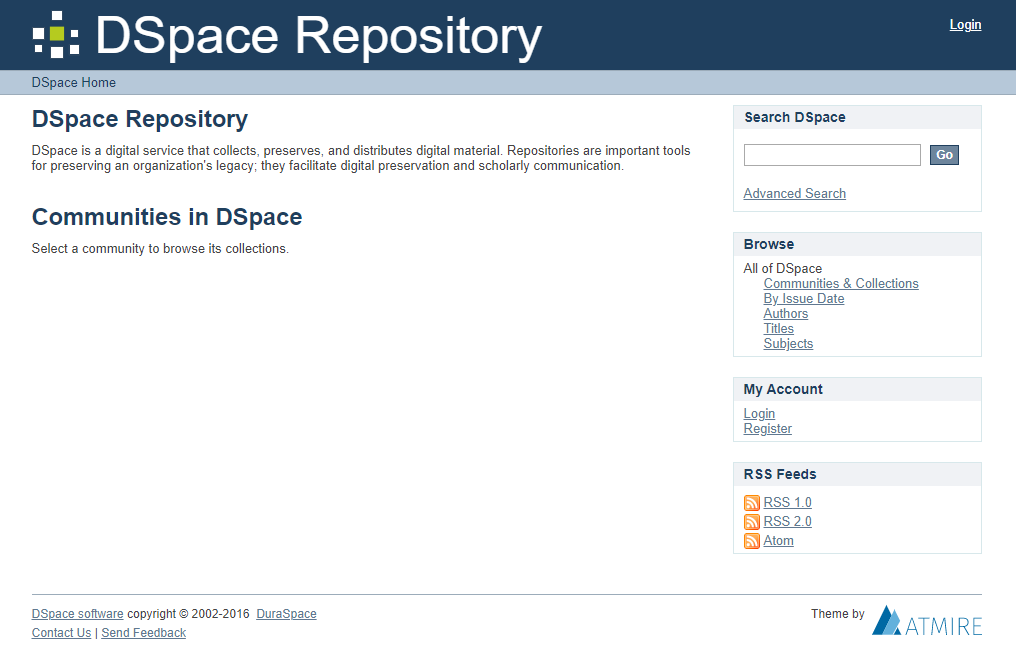
JSPUI Interface of DSpace: http://localhost:8080/jspui

Following commands are use to stop the Tomcat Server
/opt/apache-tomcat-9.0.48/bin/shutdown.sh
I hope this tutorial will help you to install the DSpace in Ubuntu.
Thank you so much